 GIANTCHECK
How to Customize Your Giant Check: Themes, Colors, Logos & Sizing
Every field in the left sidebar, in order, and what it actually changes on the check — so you can go from a blank canvas to a print-ready design without guessing.
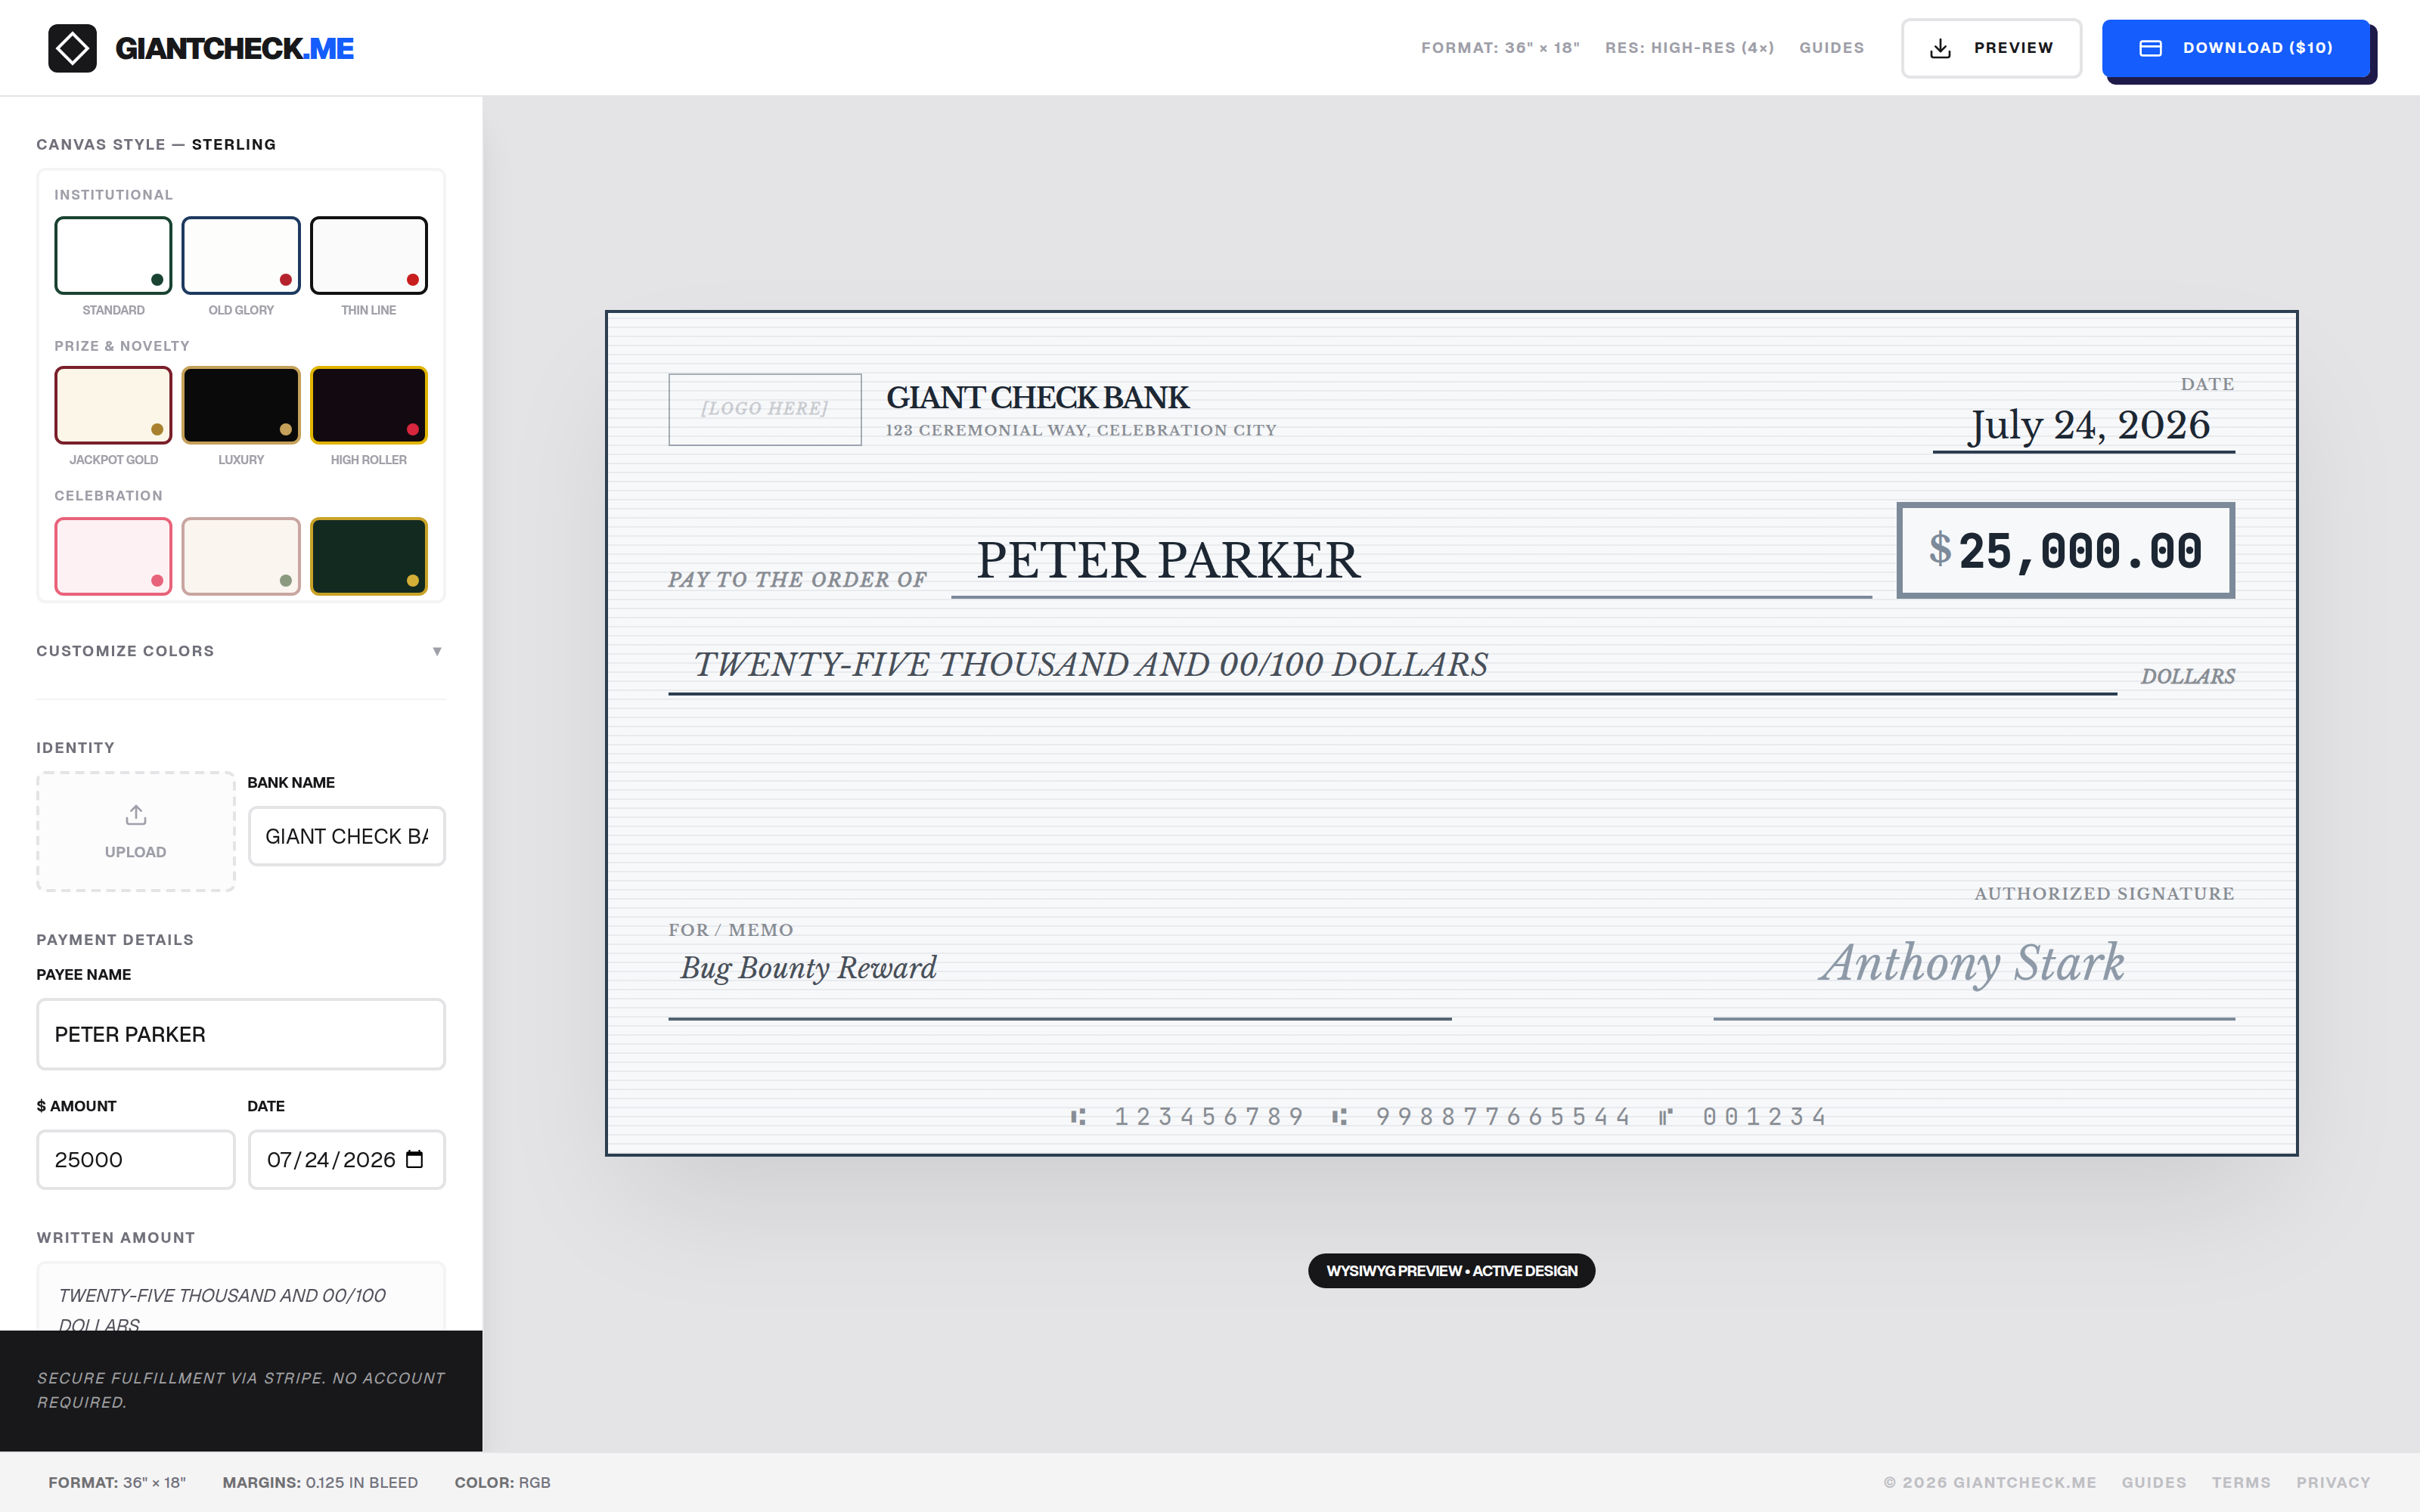
The designer is a single screen: a sidebar of controls on the left, a live WYSIWYG preview on the right. Nothing you change requires a save button or a page reload — every field updates the check instantly, so it's worth actually trying things rather than reading about them. Here's what each section does, top to bottom.
1. Canvas Style — choosing a theme
The theme picker groups all 28 themes into 13 categories — Institutional, Prize & Novelty, Celebration, Sports & Teams, Cause & Community, Tech & Modern, Rustic, Business & Real Estate, Creator & Media, Finance & Insurance, Travel & Leisure, Retro & Nostalgia, and Gala & Auction. Each swatch shows the theme's actual background, border, and accent color, so you're picking from a live preview rather than a name alone.
Theme controls four things at once: the background and border colors, the accent color (used for the amount box and payee underline), the body font, and a decorative background pattern — a sunburst, a ribbon, a confetti scatter, and so on, depending on the theme. See the full theme list for what each one looks like.
2. Customize Colors — overriding a theme's palette
Click "Customize Colors" to reveal five color rows: Background, Primary Text, Accent, Signature Text, and Border. Each one can be set from a small swatch palette or a full custom color picker. This is how you match a specific brand, team, or family color without waiting on a new theme to be built — start from the closest theme, then push just the accent (or any other field) toward the exact hex you need.
Two things worth knowing:
- Switching themes clears overrides. This is intentional — it stops you from ending up with, say, Luxury's black background and Charity's blue accent by accident. Pick your theme first, then customize colors.
- "Reset to Theme" undoes everything at once — a faster way back to the default palette than clicking through each row individually.
3. Identity — logo and bank name
Upload a logo (under 2MB, most image formats work) to replace the placeholder box in the top-left corner, and set the "bank name" field — which doesn't have to be a bank at all. It's just the largest, boldest text in the header, so it's commonly used for a company name, a tournament name, a foundation, or a title sponsor.
The logo is read directly in your browser and isn't uploaded anywhere until you actually purchase the high-resolution download — it's stored locally as part of your in-progress design.
4. Payment Details — payee, amount, and date
Payee name, dollar amount, and date. The written-amount line below ("TWENTY-FIVE THOUSAND AND 00/100 DOLLARS") is generated automatically from whatever you type in the amount field — you never have to spell out a number by hand, and it updates as you type.
5. Authorization — memo, signature, and signature font
The memo field is the "for" line — usually the reason for the check ("Bug Bounty Reward," "Hole-in-One Prize," "10K Subs!"). The signature field accepts any name or title, and four signature fonts are available: Classic (serif), Script, Formal (a more ornate cursive), and Modern (sans-serif) — independent of whatever font the theme itself uses for the rest of the check.
6. Print Size — choosing the physical dimensions
Four sizes are available: 18" x 9", 24" x 12", 36" x 18" (the industry-standard size most print shops expect by default), and 48" x 24". All four are the same 2:1 landscape ratio, so switching sizes never changes the layout or repositions any field — it only changes the physical dimensions of the final printed piece and the PDF page size.
Resolution scales with whichever size you pick, so a larger physical check doesn't come out softer — the export is generated at the pixel density needed for that size to print cleanly, not a single fixed resolution stretched to fit. Pick 18" or 24" for a desk, table, or small-room reveal; 36" or 48" for a stage, a stadium screen, or a photo meant to be seen from across a room.
7. Visual Bleed Guide
Toggles a dashed guide line 0.125" inside the check's edge — the standard bleed margin most print shops trim to. It's an on-screen guide only and is never included in an exported file; use it to make sure nothing important (text, a logo, a signature) sits close enough to the edge that a trim could clip it.
Nothing here requires an account
Every customization option is free to use while you're designing. The only charge is $10 for the final clean, high-resolution PNG and PDF — the free Preview button exports a watermarked screen-resolution copy any time you want to check your work.
Start customizing
Open the designer and work through the sidebar top to bottom — every change previews instantly on the canvas.
Open the Free Designer →$10 for the clean, print-ready download · no signup required
Frequently asked questions
Does changing the theme erase my custom colors?
Yes, by design — switching themes resets any color overrides back to that theme's defaults, so you always start from a clean, coordinated palette rather than a mix of two themes' colors. Re-apply your overrides after picking the theme you want to land on.
Is my logo uploaded to a server while I'm designing?
No — the logo is read directly in your browser and stored as part of your design locally. It's only uploaded once, at the point of the paid download, so the high-resolution file can be generated and delivered.
Does picking a larger print size make the file blurrier?
No. The designer scales the export resolution to match the print size you choose, so an 18" and a 48" check are both delivered at the same print-quality DPI rather than the same file stretched further.
Will my design still be there if I close the tab?
Yes, for the duration of a single purchase flow — your in-progress design is kept in your browser's local storage so it survives the redirect to Stripe and back. It isn't saved to an account, since the designer doesn't require one.